It's bread so the basic principles are pretty universal, but I'll try to describe my process as best as I can. Full disclosure - this turns out a little differently every time I make it, often because I'm letting the dough rise while I'm doing other things and the timing gets... variable. But at the end, it's always fresh, warm, bread. And it's hard to complain about that.
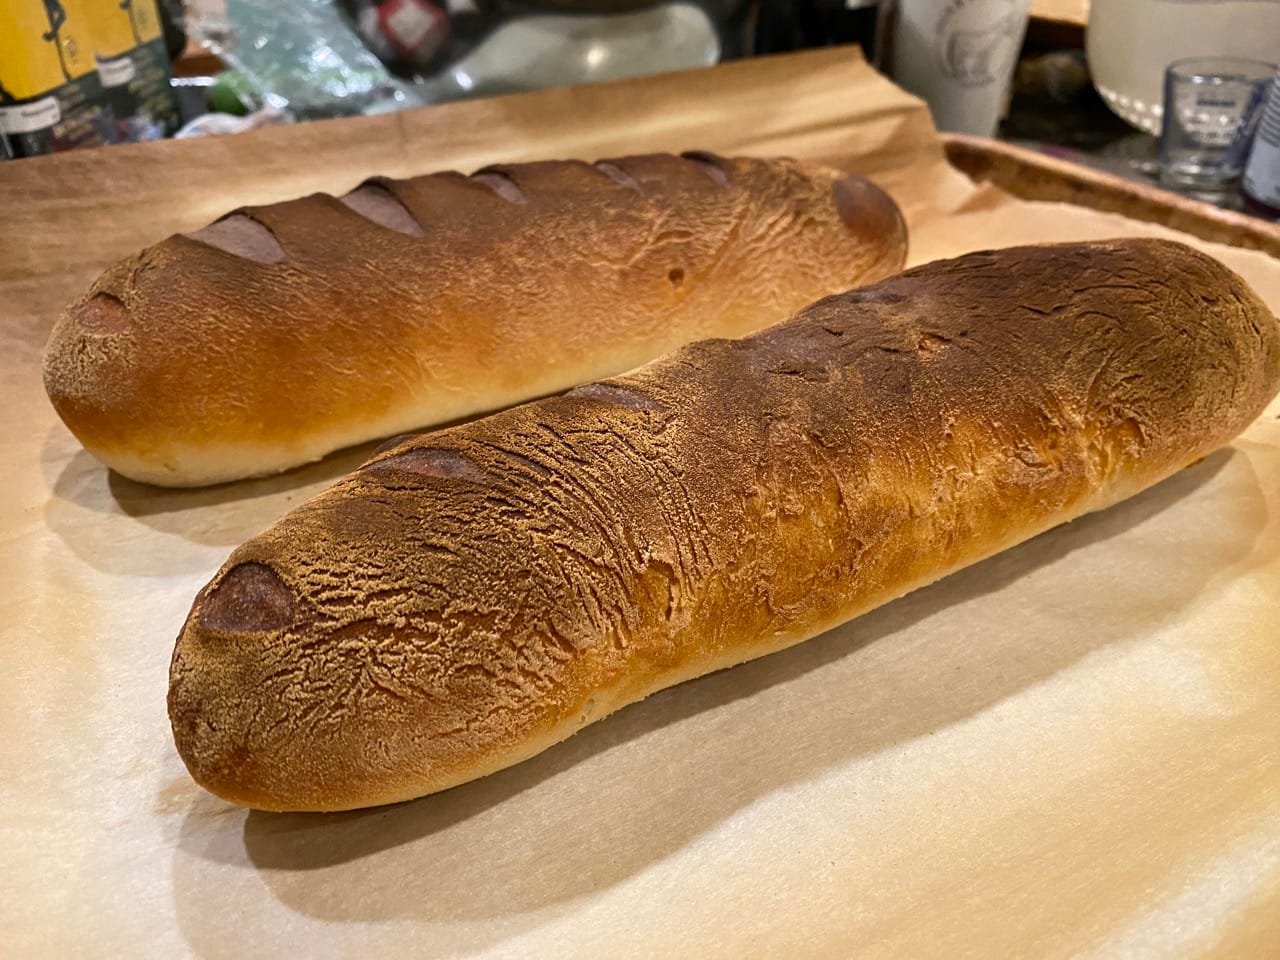
Also, if you've eaten this when I make it you've probably seen it be somewhat baguette shaped. This is also not a traditional baguette, I make no claims to authenticity. I just like that shape.
Also, this is a long post. It's not because making bread is complicated (though it does take a lot of waiting), that's still true, I'm just very, very thorough.
Okay, enough disclaimers.
Loaf me, loaf me, say that you loaf me
Wait, no, a few more disclaimers. I'm going to provide the quantities in grams and a best estimation of what that probably in measurements of cups/tbsp/tsp, but know that when I make this I am doing it by weight. Kitchen scales are fairly inexpensive and very useful for baking, I cannot guarantee results if doing this by other measuring implements.
I also don't guarantee results, just... regardless.
Mama tells me I shouldn't measure
A full batch (makes two loaves the way I divvy it way) needs:
- 488g (4 cups) bread flour
- I use Robin Hood Homestyle White
- 10g (1 tbsp) instant yeast
- I use Fleischmann's Instant Yeast/Bread Machine Yeast/Rapid Rise Instant Yeast (they're all exactly the same under different names)
- 12g salt
- I hesitate to estimate this in teaspoons because it really depends on how fine your salt is, but it's probably about 2 tsp of Diamond Crystal Kosher Salt.
- 355g (or ml, whatever) water between 110°F-120°F (43°C-49°C)
- Note 1: this is about 1.5 imperial cups, less in metric cups. In Canada we're too fucked up to know what anyone has in their kitchen, double check yours.
- Note 2: yes, that's pretty hot water. In fact 115°F is, conveniently, just the temperature my water comes out of my kitchen faucet at when it's turned all the way to hot. I recommend using a thermometer if you have one to double check yours, because if it gets much hotter it'll start having detrimental effects. If your water is cooler that's fine, it'll probably just affect your rise times - the hot water just helps get the yeast party going.
You can also make a half-batch for a single loaf (or two mini ones):
- 244g (2 cups) bread flour
- 5g (0.5 tbsp) yeast
- 6g salt (1 tsp)
- 178g water (0.75 'merican cups, still hot)
Tell me that you knead me
Combine all the ingredients, preferably in a stand mixer if you have one. They are very nice, I do highly recommend, but I accept that they are large and expensive beasts that are hard to justify for many. The half batch is easier if you're using your hands (and actually doesn't even work that well in my mixer because there's just not enough in there).
In the stand mixer, you'd probably expect to use a dough hook attachment - ha! No, that is naught but a deception. Use a flex edge beater if you have one that scrapes up the sides of the bowls. You can get a cheap one from Walmart for like $20.
Mix the dough in the stand mixer at low speeds, no more than level 2 on a KitchenAid. If you're being smart you could reserve a little flour to sprinkle down the sides of the bowl to stop it from sticking as it mixes. If you're me you walk away from that shit and get other things done. Though it is good to check in every once in a while to make sure the dough has not totally adhered to the attachment or found a way to flatten itself along the bowl to avoid contact.
After about 3-5 minutes (theoretically, I do not actually time this) return to your mixer and witness a stretchy mass of dough being whomped around. Most recipes I've read say it will eventually stop sticking to the sides of the bowl. My experience is that this does not happen, it'll always be pretty sticky, but it should hold together and be quite elastic, and should look uniform.
Extricate the dough from its beloved attachment. I just keep it in the mixer bowl at this point. If you're smart you'll flour your hands before you try to move it. Usually I am not smart.
I hear you can also do this in a food processor, which you might be more likely to have. You know how to search the internet, be independent and figure it out.
If you're doing this by hand, put everything in a bowl and mix it, with your hands or I guess potentially with some sort of implement if you're fancy folk. Keep kneading until it's uniform. Watch a YouTube video on how to do this if you need to, I don't have any technique you can learn from. Flouring your hands is pretty critical to avoid having accidental dough gloves.
I can't care 'bout anything but proof
Now, we mostly wait.
Before we wait, make sure the dough is covered. There are lots of ways people say you can do this, putting a towel over it, whatever. I stretch plastic wrap over the same bowl I just mixed it in.
You want the dough to roughly double in size. How long this takes exactly depends on factors like ambient room temperature and whether or not you remembered to set a timer on your phone. If your oven has a proof mode that can be very convenient, especially if your kitchen is a little chilly. In a warm room/proof mode oven, this takes about 40-50 minutes.
You then "punch down the dough", or the technique I learned was to take one edge and stretch/fold it all the way over the the other side, rotate 90 degrees and do that again on top of the last fold, four times in all, then flip it upside down so the seam is down. Cover it again, and let it proof another 40-50 minutes until double again, and then punch it down again.
If you're doing the full recipe, divide the dough ball into halves (or do it anyway with the half recipe if you want tiny little adorable loaves). Flour a surface/cutting board pretty heavily, and stretch the dough out into a rectangle as best you can, I probably get it about 12 inches by 7-8 or something like that, it's not super important. A rolling pin or wine bottle can help here, you'll probably want to flour that too. The dough will be very elastic and will resist, and try to stick to everything. Your petulant bread children will need a firm hand to be brought in line.
Once you've got it rectangle-ish, roll it up along the long edge to make a log. Pinch along the seam so it stays together, as well as the ends (I kind of stretch it over the ends so they're fully covered). Carefully transfer onto a baking pan, parchment paper helps keep it from sticking. Do this again with the other half, make sure they have a decent amount of room between each other and the edges of the pan - those are growing boys.
You can also make these any other shapes you want. I'm not your mother, do what you like.
If you like being a little fancy (of course you do) get a sharp knife and gently score diagonals every few inches along the top, no more than an eighth of an inch deep. Cover this as best as you can with a large towel or, if you're like me, wrestle three or four sheets of plastic wrap into a mess that you stare at angrily. I pop this into the oven and close the door to help keep the air from drying it out.
Wait another 45-60 minutes until they double in size again.
So I cry, and I spray, and I bake
The secret to the crust on my bread is water. I fill a second baking sheet with some water, probably not more than half a centimeter deep, and place that on the bottom rack of the oven (other rack should be about center).
Preheat the oven to pretty much as hot as it will go (I tell mine 500° and it tries its best but will struggle to get past 450°) with the water pan inside, we want it to get steamy. Remember to take the pan with the bread out first if you put it in there to proof.
If you don't want to do the whole second pan thing, you can also try spraying them with water - apparently it has a similar effect. You basically just want steam on the outside making that crust.
Once your oven is preheated, or seems to have stopped making significant progress towards its goals, pop that pan with the loaves in there (watch out for the cloud of steam as you open the oven).
Depending on how hot your oven got and the shape of your loaves, the exact time is variable - could be 8-10 minutes if it's closer to 500°, could be more like 15-20 if it's 400°. The colour isn't necessarily the best indicator - they should sound hollow when tapped. Or, if you have an instant read thermometer (like meee), you don't have to do all this guessing and you can just pull them when the inside reads 190° F.
Remove from the oven, stare at them intently as they cool, preferably on a wire rack to speed it up a little. Eat warm bread.
Could you at least try to be more concise
Yeah fine, here is what I actually follow:
- 488g bread flour
- 10g instant yeast
- 12g salt
- 355g water between 110°F-120°F (43°C-49°C)
- Or half:
- 244g bread flour
- 5g yeast
- 6g salt
- 178ml water
- Combine ingredients in stand mixer. Mix until it mostly no longer sticks to bowl.
- Proof 40minutes-50minutes until doubled
- Take out and fold dough each edge over center, place seam side down. Cover at let rise another 40min-50mins
- Fold dough over again. Divide into 2 halves. Roll out on floured surface and stretch to a rectangle/oval. Roll up and seal seams/cover ends.
- Score tops
- Let rise for 45-60 minutes
- Heat oven to 500 with a pan of water at the bottom.
- Cook for 8-10 min and check. Ready at internal temp of 190
Multiple people have now asked me what my hair routine is, so I decided to make a guide to share. It's not simple and it's not quick, and there are definitely some things on the luxury pricing end of things here - but honestly the exact brands and products are probably less important overall than the technique. I've made a few suggestions of alternatives, but see the notes after the routine for some more discussion and a greatly simplified version.
Routine
- Use a clarifying shampoo (pretty much any brand will do fine, no need to be fancy here) to reset at the beginning of a routine and occasionally (once per 2-4 months) to wash out excessive product buildup.
- Use Nizoral treatment as needed to address dandruff/dry scalp
- Try not to wash hair more than once every 4-6 days (if styling from wet is needed more frequently in between, skip washing with shampoo and go straight to conditioning)
- Through pretty much all these steps, keep your hair hanging down by bending forward, almost upside-down - will give better access to scalp, keep product off your skin (no bacne), and helps with volume.
- When washing, use a shampoo-conditioner - I use Curl Quenching Conditioning Wash by Curlsmith and leave it in for 5 minutes as per the instructions on the bottle.
- Work it into your scalp and hair until its slick and easier to start detangling. While waiting for the 5 minutes to pass, try to work through most of the biggest knots and tangles with your fingers at this point, especially the ones closest to your scalp, but don't worry about getting all the little ones yet. A strong wide-tooth comb will work too. Never detangle with your hair dry or without product in it.
- Rinse out thoroughly, keep running fingers through hair to work out tangles.
- Next, conditioning - skip to this step if you've already used shampoo in the last few days.
- I use Living proof Perfect Hair Day Conditioner (PhD) - this shit is expensive but it works, if you're going to splurge on anything in this list this is probably the one. Get the 1L refill pack and get a cheap reusable bottle to fill or just use it out of the bag, it's half the price. But if spending $100 on conditioner is not something you can justify to yourself, before I found PhD I used TRESemme Botanique Nourish & Replenish Conditioner which you can find at most drug stores for a literal fraction of the price - it's decent.
- Put a palm-sized amount of conditioner into your hand and work it into your hair in sections with your other hand, try to evenly distribute it but it doesn't have to be perfect because of what we're doing next.
- Use a Tangle Teezer to brush your hair thoroughly - I don't know why it works so much better than anything else I've tried but it does, I was skeptical when it kept getting recommended to me but it really is the best working through a rats nest of tangled curls with minimal breaking and loss and so much less effort. I used to dread the sore arm I would get trying to work through everything with a wide-tooth comb.
- It still isn't quite good enough to get the biggest knots out or the ones very close to the back of your scalp, so use your fingers here first if you didn't already when washing.
- The Teezer should also distribute the conditioner evenly through your hair and should eventually be smooth and easy to run through. Rinse out the Teezer so it doesn't have conditioner left on it, we're not quite done with it yet.
- If you had some tangles to work through you can probably ready to rinse by now, but if it was quick make sure you do leave in the conditioner for at least a few minutes.
- Remember your hair should still be hanging down in front of you all this time and as you rinse.
- Once it feels like all the conditioner has been rinsed out, get ready for some leave-in products. Your hair should be dripping wet - if you have a bit more of your shower routine to go, just make sure you give your hair one more good rinse before you turn the water off.
- With your hair sopping wet, add a gob of leave-in conditioner in sections - I use Ouidad Moisture Lock Leave-in Conditioner.
- Use the praying hands method to evenly distribute it - basically taking a section at a time between your palms and running them from scalp to tip, a way to apply product uniformly without causing too much frizz. You can google to find videos and guides with more info.
- Optionally, use a bit of protein cream - not as nearly as much as conditioner, just a little bit. I use Curlsmith Featherlight Protein Cream. This step is not critical, but I find it works really well for my hair to keep the curls lasting and not dry/frizzy so it's a fixture in my routine. Again, work it in in sections and use the praying hands to distribute.
- Finally, if I'm going for some real dramatic volume and impact, I add some Ouidad Volumizing Foam the same way. I definitely don't use it every time, but if I'm going to the Birdhouse or something then it's a fun way to impress.
- Finally (are you remembering to keep your hair hanging in front of you? Is your neck getting tired yet?) it's time for gel. The important thing here is to not be afraid of a strong hold - you're not going to end up with plastic-hard castings, everything is going to be nice and pillow-y soft and defined, trust me.
- But first - remember how we weren't done with the Teezer? Break that back out and just quickly run it through your hair from scalp to tip in sections, it makes really nice well-defined lines/clumps to work with that don't tangle/frizz.
- I use Curlsmith Shine Gel - it's one of the ones with the strongest hold and its unscented, but can be a little hard to find. This is my secret weapon as much as anything on this list. If you can't find it, their In-Shower Style Fixer product is essentially the same thing but scented.
- I can also recommend Ouidad Advanced Climate Control Heat and Humidity Gel Stronger Hold (the stronger hold part is important) as an alternative that's easier to find and is a little less intense.
- A budget-friendly option that also works decently well is Not Your Mother's Curl Talk Frizz Control Sculpting Gel, which you can find for $10ish at Shopper's or Walmart.
- Your hair should still be dripping wet, though applying the leave-in products will have squeezed a fair bit of water out already.
- Take a glob and rub your hands together to spread it. Starting from the tips with your hair hanging down in front of you, scoop your hair up in your hands and bring it to your scalp, gathering it along along the way. Once at your scalp, scrunch/squeeze it hard, force as much water out as you can.
- Add a bit more gel to your hands and scoop/squeeze more sections, making sure it gets nice and evenly distributed. Keep scrunching until you see well-defined thick curls forming.
- Now, I have a controversial move here: I do not towel dry my hair at all - I find the curls form best if I go straight to blow-drying, but it does take a long time. If you don't have that time, and I don't always, use an old t-shirt or a microfibre towel and wrap your hair in it and give it some squeezes. But if you do, keep scrunching in the shower until your hair is no longer actively dripping wet, squeezing hard to get as much free water out as possible.
- Tired of keeping your head hanging now? Yes? Too bad, it's time to blow dry.
- This is, sadly, probably the most critical step the whole process to get the really gorgeous curls. I find air-drying just weighs it down too much through the process and you lose the most of the curl except at the very ends. You'll need a dryer with a diffuser (not optional USE A DIFFUSER) and maybe something to watch.
- What you will do is called the pixie method/pixie diffusing - you can google it for videos and tips, but basically you:
- Gather up a big section of your hair into the diffuser bowl - I usually do 2-3 sections, either left-and-right or left-middle-right.
- Bring it up to your scalp and turn the blow dryer on for 30-60 seconds, low heat and high speed.
- Turn it off while it's still close to your scalp.
- Bring it down, scoop the other section, and repeat.
- While drying one section, continue to scrunch/squeeze the curls in the other section up towards your heads to soften up the casting. Break up any very thick clumps by running your fingers through them starting at your scalp, otherwise they'll take a loooong ass time to dry.
- The object is to not have the blow dryer running as you move between sections, as this will blow hairs out of their castings and leave you with frizz. This is also a pain in the ass. There's no way around it but the results speak for themselves.
- Keep looping through sections until hair is like 70%-80% dry - what you should be watching for is your hair starting to tightly curl up, it will stop hanging so low and be curly close to scalp instead of hanging straight from the damp weight. You should be looking at your hair and thinking it's starting to look like what you want to it stay like all day.
- At this point, depending on what I'm doing and what kind of day/night I'm planning to have, I might go in one of two directions:
- If this is just a normal day and I want my hair to last and feel nice for a few days - I'll add a little more gel at this step.
- If I'm going out for an evening and want some serious volume and tightly defined curls (but it won't feel as nice or last quite as long), I'll hit it with the hair spray (still hanging upside down, of course!). Sebastian Professional Shaper Plus Extra Hold Hairspray works great for me. Make sure to get up near your scalp, all this hanging upside down is about to pay off.
- Continue to diffuse with the pixie method for one, maybe two more loops with the extra gel/spray in - it should dry very quickly now.
- Give it some final scrunches to break in anything that dried hard.
- Dramatically flip your hair back, admire yourself in the mirror, and go ask someone for a neck massage - you're finally done.
- Oh but one more thing - sleep in a cap to protect your hair, especially if you toss and turn like moi. The styling will last a lot longer. I use this bonnet.

Notes
Choosing products
The most important thing that I’ve picked up from research and the curly girl method is definitely avoiding sulphates to prevent dryness. Silicones are also generally avoided, they’re not the worst but it’s mostly because they will build up over time - we’re trying to avoid having to shampoo too often (and conditioner-washing won’t remove silicones) and that build-up will eventually weigh down the curls. If you have no choice but to wash your hair really frequently (because of work, you’re a swimmer, whatever) don’t worry too much about silicones.
So keeping that in mind, you probably do not need to use all the expensive products I use to get similar results. This is a good resource for curly girl adherent products that are widely available in Canada and far more affordable.
So if the expensive products aren't what's important, what is?
I'd say the critical parts of this routine that make a real difference for me have been:
- Making sure I wash my hair with a shampoo product no more than once every 4-6 days so it doesn't dry out.
- No products with sulphates (again, avoiding dry hair).
- Use a leave-in conditioner.
- Use a very strong hold gel that is designed for curly hair, as strong as possible.
- Add leave-in products and gel when hair is as wet as possible.
- To the above points - getting good curl definition is a battle of locking in moisture. Everything is towards that goal.
- Tangle Teezers are literally magic.
- Keep head upside down.
- Diffuse, diffuse, diffuse.
- Use pixie method (turn blow dryer off between sections) to avoid frizz.
What's probably not that important?
- The protein cream.
- The volumizing foam.
- Using a 2-in-1 shampoo-conditioner versus a normal shampoo and conditioner.
- The extra gel/spray step.
- Not towel drying at all.
I'm not saying these things make no difference, but you'll probably get 80% results without them and they're extra expense and work.
So a simplified version would be...
- Every 4-6 days, wash your hair with a sulphate and silicone free shampoo while working through large tangles with your fingers. Rise.
- Apply conditioner and use a Tangle Teezer (or wide-toothed comb) to comb out remaining tangles. Rinse.
- Apply leave-in conditioner using the praying hands method.
- Create curl clumps by running the Tangle Teezer/comb through.
- Cover palms in a strong hold gel and scrunch curls to create castings and squeeze out water.
- Optionally squeeze out water with microfibre towel or old cotton shirt.
- Use pixie diffusion method to dry by moving diffuser from section to section with the blow dryer turned off in between.
Where the fuck did this all come from?
I had been messing around with the curly girl method and various products for a while, but then I saw a reddit post (now deleted) with the following routine:
- Nizoral for shampoo. I like it because it feels like it cleans my hair and scalp well.
- Living Proof PhD conditioner. I detangle with the conditioner in.
- Ouidad leave in if I have a lot of frizz (did not use it this wash day. I don't use this and curlsmith together)
- Curlsmith feather-light protein cream (read somewhere that stringiness can be caused by bad protein/moisture balance. I don't think it weighed my hair down much)
- Brush styled the hair. I usually get curl clumps just by brushing the hair through. I try to avoid scrunching because of frizz.
- Used microfiber to get extra water out. At this step, my hair is wet but not dripping wet.
- Airdry for an hour until wet but not soaking wet. At this point, about an inch of the ends is dry-ish
- Ouidad advanced climate control gel (my hair was styled with this when I got a wavy/curly cut and it looked gorgeous. I applied it when my hair was ~ 30-40% dry for better hold)
- Diffused hair to about 90% dry. I let the roots and bottom layers finish air drying because it takes a really long time)
- Clapped my hair a bit to get any crunch out.That's it.
The photos on the post were of pretty much my hair type and exactly the look I wanted, so I dropped pretty much everything and started copying it almost directly (except for the air drying). I have drifted a bit since then:
- I only use Nizoral for targeted treatment as needed. I used a different shampoo originally, and now the 2-in-1 shampoo-conditioner.
- I add the volumizing foam on occasion.
- I do not avoid scrunching.
- I do not use a microfiber towel.
- I switched gels.
- I add spray on occasion.